
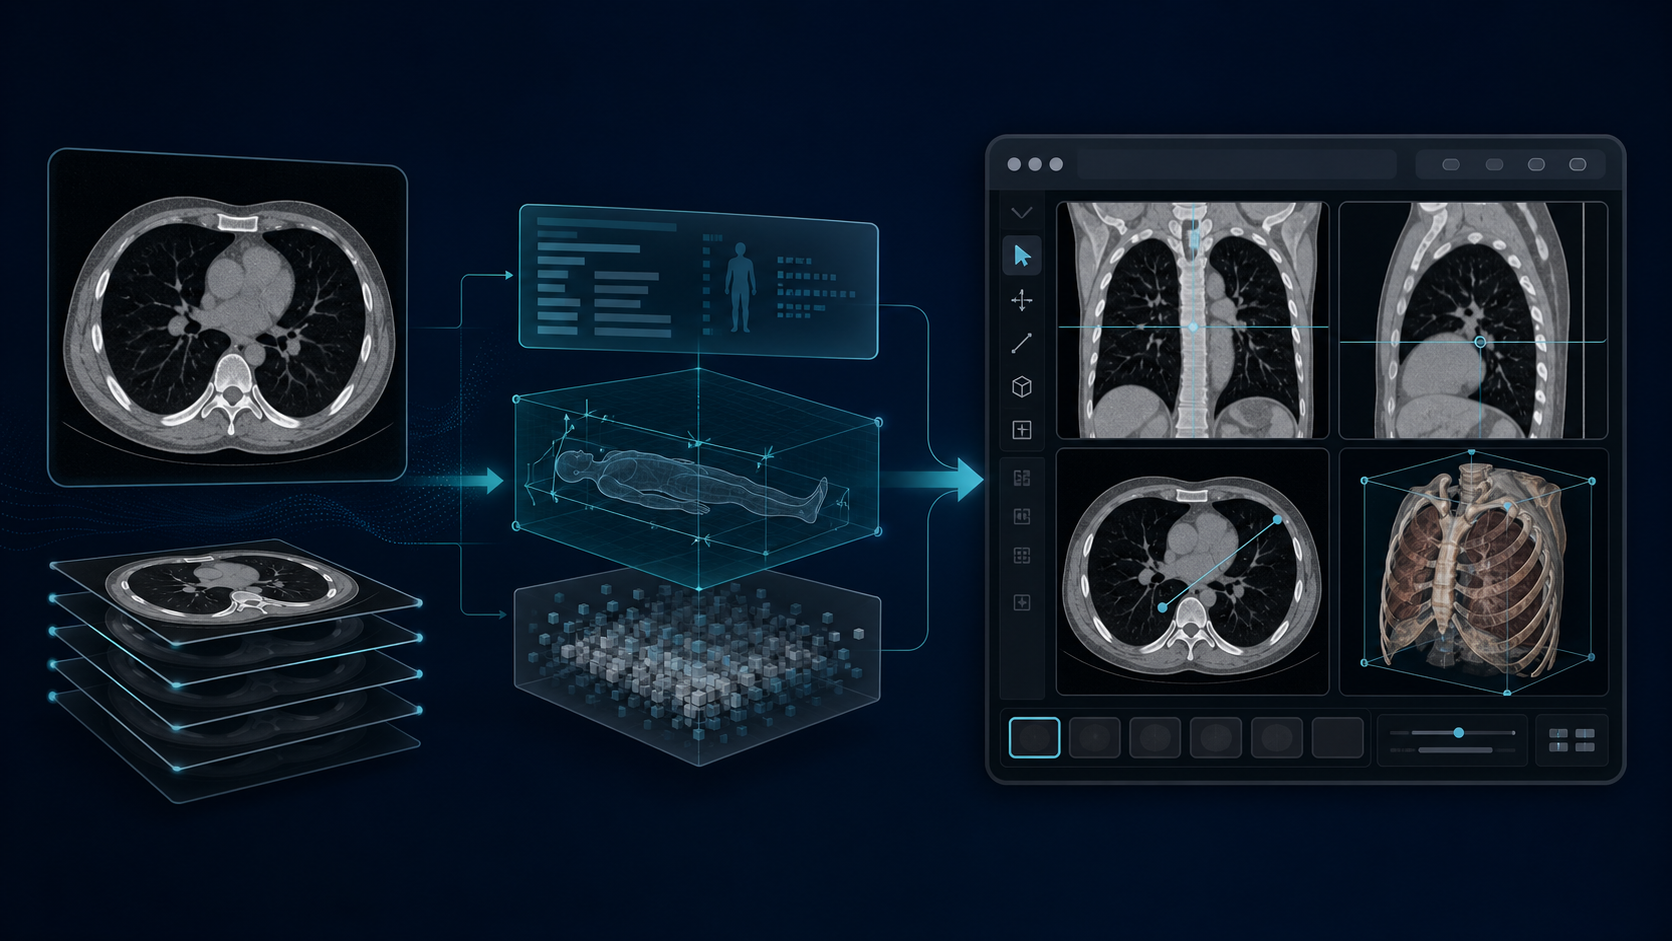
A DICOM viewer turns more than pixels into a useful image: it also interprets the scan’s metadata, geometry, encoding, and presentation rules.
You may not recognize the word DICOM, but you have almost certainly seen one.
The chest X-ray displayed in a hospital, the CT scan a radiologist scrolls through slice by slice, and the MRI shown in axial, coronal, and sagittal views are all commonly stored and exchanged as DICOM objects.
To a person, these look like images. To a browser, however, they are not JPEGs
or PNGs that can be dropped into an <img> tag. A DICOM contains the image,
but it also carries the information needed to understand that image: how its
pixels are encoded, where it sits inside the body, which study it belongs to,
and how it should be displayed.
That difference is the beginning of our story.
We will start with a familiar image file, discover why medical images are more difficult, meet Cornerstone3D—the engine that makes browser rendering possible— and then see how two packages simplify the remaining work:
react-dicom-viewerturns Cornerstone3D into a reusable React viewer.dicom_transcoderhelps a backend decode, encode, and separate DICOM metadata from frame data when that preparation is needed.
A JPEG is a picture. A DICOM is a picture with medical context
DICOM stands for Digital Imaging and Communications in Medicine. The standard covers more than images—including objects such as segmentations and structured reports—but this article focuses on DICOM image instances.
Imagine receiving two files: holiday.jpg and chest-ct.dcm.
The JPEG already speaks a language the browser understands. It describes a rectangular image with color values. The browser decodes it and displays it:
<img src="holiday.jpg" alt="Holiday photograph" />The DICOM file tells a much larger story. Along with Pixel Data, it may contain:
- patient, study, series, and instance identifiers;
- modality information such as CT, MR, or ultrasound;
- image dimensions and pixel spacing;
- the position and orientation of the image in patient space;
- bit depth, signedness, and photometric interpretation;
- windowing and rescale information;
- one frame or many frames in the same instance;
- the transfer syntax used to encode the data.
The contrast is easier to see side by side:
| JPEG or PNG | DICOM |
|---|---|
| Primarily describes a displayable picture | Describes a medical-imaging object |
| Usually 8-bit display-ready color or grayscale | May contain 12-bit or 16-bit signed medical values |
| Decoded natively by browsers | Requires a DICOM-aware loader and codec |
| Has width, height, and basic color information | Includes geometry, identity, acquisition, and presentation metadata |
| Represents one conventional image | May contain a single frame or multiple frames |
Can normally be rendered with <img> | Needs a medical-imaging rendering pipeline |
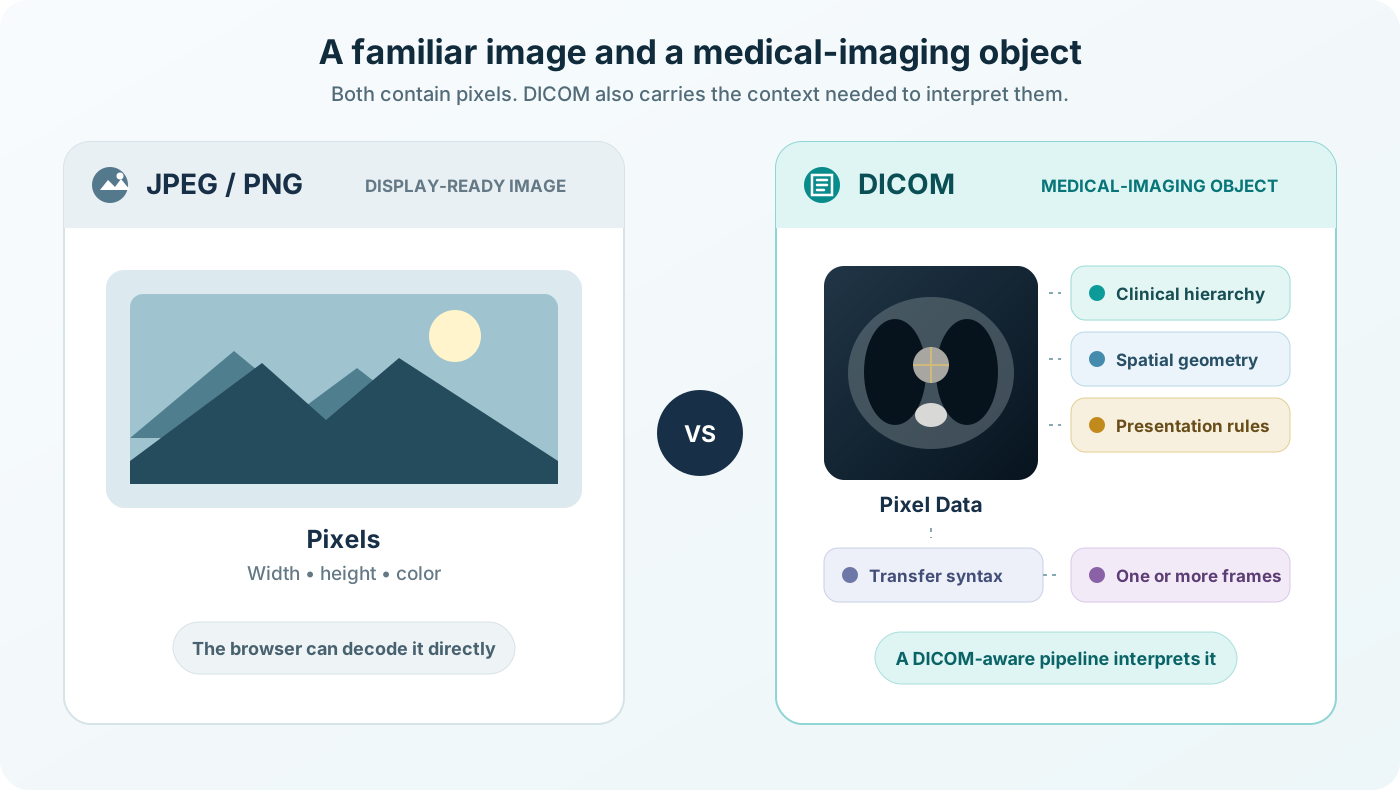
A conventional image is designed to be displayed. A DICOM object is designed to preserve the medical context needed to interpret and exchange the image.
A useful analogy is this: a JPEG is a printed photograph. A DICOM is the photograph, the envelope it belongs in, a map showing where it was taken in the body, and a set of instructions for interpreting its values.
The DICOM hierarchy
DICOM objects are grouped into a clinical hierarchy:
Patient
└── Study
    └── Series
        └── Instance
            └── One or more frames
A CT examination may be one study containing several series. One series can contain hundreds of instances representing adjacent slices. Together, their metadata describes how those images relate to one another.
This is why the technically precise term for “a DICOM” is usually a DICOM
instance. A Part 10 .dcm file normally stores one such instance. Its file
meta information includes the Transfer Syntax UID, which tells a decoder how
the data set—and often its Pixel Data—has been encoded. The Part 10 format is
defined by the DICOM standard
(DICOM PS3.10, Chapter 7).
Why can’t we view it like a normal image?
Suppose we are building a web application for radiologists. We receive a folder
of .dcm files and try to display the first one.
The first obstacle appears immediately: the browser does not natively decode a DICOM Part 10 file.
After adding a decoder, more problems appear.
The pixels need instructions
Pixel Data is not self-describing. The same bytes can mean different things
depending on BitsAllocated, BitsStored, PixelRepresentation, and
PhotometricInterpretation. The stored values may also require rescaling and
windowing before they become a useful grayscale image.
If those rules are ignored, an image may look plausible while its numerical values are wrong.
A series is more than a list of filenames
Medical images must be ordered using DICOM metadata and geometry. Filenames and HTTP response order are not reliable. To reconstruct a volume, the viewer needs image position, orientation, pixel spacing, slice spacing, dimensions, and a consistent frame of reference.
If that geometry is wrong, a coronal or sagittal reconstruction can be wrong even when every individual axial slice looks correct.
One instance may contain multiple frames
A DICOM instance can contain a single frame or a sequence of frames. Before rendering, the application must turn the source into an ordered set of image IDs that addresses the images Cornerstone should load.
Medical images are large and interactive
A useful viewer cannot wait for an entire study before responding. Users expect smooth scrolling, prefetching, loading indicators, window/level adjustment, zoom, pan, measurements, cine playback, synchronized viewports, MPR, 3D, and segmentation.
The problem is therefore larger than decoding a file. We need a rendering system.
Cornerstone3D: the medical-imaging engine for the browser
Cornerstone3D solves the low-level browser-rendering problem. It provides the concepts that a medical viewer needs:
- Image IDs identify renderable images.
- Image loaders retrieve and decode data for an image-ID scheme.
- Metadata providers associate geometry and pixel information with image IDs.
- Rendering engines connect HTML elements to viewports.
- Stack viewports display ordered 2D images.
- Volume viewports create axial, coronal, and sagittal views from coherent volumetric data.
- 3D viewports render a volume with camera controls and presets.
- Cornerstone Tools provides manipulation, annotation, synchronization, and segmentation behavior.
An image ID is the bridge between data delivery and rendering. Its scheme tells Cornerstone which loader should handle it (Cornerstone: Image IDs). The Cornerstone DICOM image loader supports DICOM Part 10, WADO-URI, WADO-RS, and local browser files (Cornerstone: Image Loaders).
Once an image has been loaded, Cornerstone’s rendering engine can display it in a viewport and manage its rendering state (Cornerstone: Rendering Engine).
That is a major step forward—but Cornerstone3D is deliberately a toolkit, not a complete React viewer.
A product team still has to initialize Core, the DICOM loader, and Tools; create a rendering engine; register tools; create ToolGroups; manage viewport elements; load stacks and volumes; implement a grid; synchronize viewports; listen to rendering events; display overlays; and clean everything up later.
This is where react-dicom-viewer enters the story.
react-dicom-viewer: turning Cornerstone3D into a React library
react-dicom-viewer does not replace Cornerstone3D. It packages its primitives
into a consistent React-facing viewer so application teams do not have to
repeat the same integration work.
At the component level, the starting point is small:
import { Toolbar, Viewer, viewerProvider } from "@qureai/react-dicom-viewer";

export function ImagingWorkspace() {
  return (
    <main
      style={{
        display: "grid",
        gridTemplateRows: "48px 1fr",
        height: "100vh",
        background: "black",
      }}
    >
      <Toolbar />
      <Viewer onInitialized={() => {}} />
    </main>
  );
}
Behind that component, the package:
- Initializes Cornerstone Core, the DICOM image loader, and Cornerstone Tools.
- Creates the rendering engine.
- Creates default, MPR, and 3D ToolGroups.
- Registers manipulation, annotation, and segmentation tools.
- Renders a responsive viewport grid.
- Adds overlays for loading, zoom, windowing, slice position, cine, and other viewport state.
- Configures workers and request pools for image loading.
The result is not only fewer lines of setup. It is one place that owns the viewer lifecycle and Cornerstone conventions.
The package does not dictate the backend
The image source can be:
- an existing DICOMweb server;
- Orthanc, a PACS adapter, or another imaging service;
- object storage behind a custom API;
- metadata and frames prepared with
dicom_transcoder; - local Part 10 files selected in the browser;
- a completely custom Cornerstone image loader.
At the viewer boundary, the application needs ordered DICOM metadata and image IDs. For a WADO-RS-compatible source, metadata can be registered like this:
viewerProvider.metadata.wadors.addMetadataForImageId({
  imageId,
  metadata,
});
A DICOMweb image ID might use the standard study/series/instance hierarchy:
const imageId =
  `wadors:${dicomwebBaseUrl}` +
  `/studies/${studyInstanceUID}` +
  `/series/${seriesInstanceUID}` +
  `/instances/${sopInstanceUID}` +
  `/frames/1`;
A custom API can instead expose the Part 10 instance at its own route:
const instanceUrl = `${apiBaseUrl}/medical-images/${sopInstanceUID}.dcm`;The final Cornerstone image ID also includes the scheme required by the selected
loader. If the wire format itself is custom, the application can register
another image-loader scheme and still pass its image IDs to
react-dicom-viewer.
renderSeries expects an already prepared, ordered imageIds list. The
consuming application constructs those identifiers in the format expected by
its backend and registered Cornerstone image loader. Keeping that responsibility
at the application boundary allows the viewer to remain backend-agnostic.
One API renders stacks, MPR, and 3D
For normal slice-by-slice viewing:
await viewerProvider.renderSeries({
  imageIds,
  scanIdentifier: seriesInstanceUID,
  viewportType: viewerProvider.utils.viewportTypes.STACK,
});
For an axial volume viewport:
await viewerProvider.renderSeries({
  imageIds,
  scanIdentifier: seriesInstanceUID,
  viewportType: viewerProvider.utils.viewportTypes.ORTHOGRAPHIC,
  viewportConfig: {
    orientation: viewerProvider.utils.orientations.AXIAL,
  },
});
For 3D volume rendering:
await viewerProvider.renderSeries({
  imageIds,
  scanIdentifier: seriesInstanceUID,
  viewportType: viewerProvider.utils.viewportTypes.VOLUME_3D,
});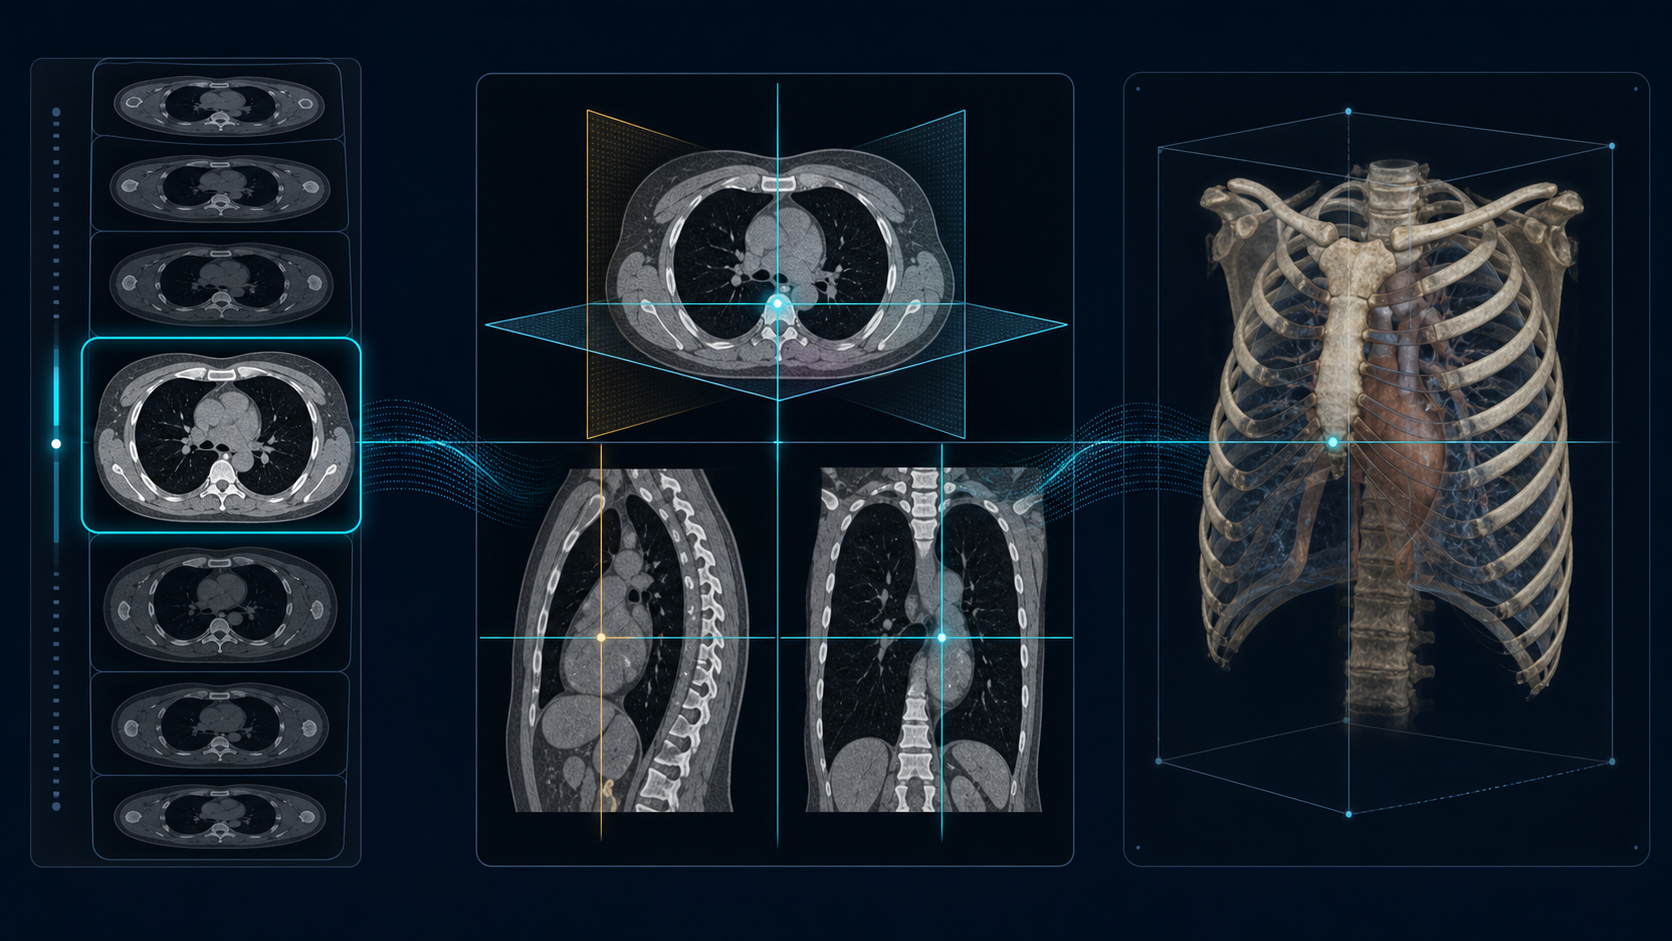
The input is the same ordered scan data. Cornerstone3D and
react-dicom-viewer turn it into the viewing mode the workflow needs.
Internally, renderSeries manages the viewport lifecycle, attaches the correct
ToolGroup, enables stack prefetching, creates and caches volumes when required,
restores cine state, and reattaches configured synchronizers.
The package also provides MPR and 3D hanging-protocol layouts, window presets, viewport grids, cine playback, and synchronization for zoom, pan, VOI, camera, slice, slab thickness, and presentation state.
It also covers annotations and segmentation
annotationHandler exposes operations for listing, adding, styling, hiding,
and removing annotations.
The headless segmentationHandler owns Cornerstone labelmaps and editing
behavior: paint, erase, contour, scissors, fill, selection, threshold tools,
segment colors, visibility, locking, opacity, outlines, undo/redo, navigation,
and statistics. It can import supported DICOM SEG files, export neutral labelmap
data, and optionally convert that export back to DICOM SEG.
The consuming application still owns the product workflow: saved-mask lists, uploads, authentication, autosave, review state, confirmation dialogs, and its segmentation panel. The library handles imaging state without forcing one clinical workflow.
At this point the browser half of the story is under control. But where do the metadata and frames come from?
The backend half: DICOMweb or a custom imaging API
DICOMweb is the standardized HTTP option. It defines:
- QIDO-RS for searching studies, series, and instances;
- WADO-RS for retrieving instances, metadata, frames, and bulk data;
- STOW-RS for storing DICOM resources.
These are part of the DICOM Studies Service (DICOM PS3.18, Studies Service).
An existing DICOMweb service can feed the viewer directly. Transcoding is not required.
But many products have a custom backend. They may store instances in object storage, use product-specific study APIs, issue signed URLs, or expose only the small part of an imaging API their workflow needs.
Such a backend still has to solve several DICOM-specific problems:
- read Part 10 files;
- decode the source transfer syntax;
- handle single-frame and multi-frame instances;
- extract metadata and frame data;
- preserve pixel parameters and identifiers;
- optionally produce another frame encoding;
- separate metadata from large Pixel Data values;
- clean up partial output when a conversion fails.
This is the problem dicom_transcoder is designed to simplify.
dicom_transcoder: preparing DICOM for a delivery service
dicom_transcoder is a Python package and CLI for processing one DICOM Part 10
instance at a time.
Its pipeline is straightforward:
Part 10 instance
      │
      ▼
pydicom reads metadata and decodes Pixel Data
      │
      ├──> DICOM JSON metadata with BulkDataURI
      │
      └──> raw frames
               │
               ▼
       JavaScript/WASM encoder
               │
               ▼
     uncompressed, JPEG-LS, or HTJ2K frames
The package uses ds.pixel_array to obtain decoded NumPy frames. Compressed
sources are decoded through the available pydicom pixel-data plugins
(pydicom: handling compressed pixel data).
Each raw frame is then passed to a bundled JavaScript/WebAssembly encoder with its width, height, bit depth, signedness, and samples-per-pixel information. The available targets are:
- uncompressed Explicit VR Little Endian;
- JPEG-LS Lossless;
- HTJ2K Lossless RPCL.
Use it from Python:
from dicom_transcoder import transcode_p10

sop_instance_uid, metadata = transcode_p10(
    "jls",
    "/data/input.dcm",
    "/data/output",
    verbose=True,
)
Or from the command line:
dicom-transcoder \
  --transcode-to htj2k \
  --input-p10-path /data/input.dcm \
  --output-path /data/output
For an instance that produces several frame payloads, the result looks like this:
output/
├── metadata/
│   └── metadata.json
└── transcoded_frames/
    ├── 1.mht
    ├── 2.mht
    └── ...
The metadata is emitted as DICOM JSON. Pixel Data is replaced by a
BulkDataURI, allowing the service to keep metadata lightweight and retrieve
frames separately. The backend decides where those files are stored and which
URLs expose them.
The service may follow DICOMweb conventions, or it may provide custom routes such as:
GET /api/series/{seriesId}/metadata
GET /api/instances/{instanceId}/frames/{frameNumber}
The transcoder is not a PACS or an API server. It also does not rebuild a new downloadable Part 10 file. It produces the metadata and frame artifacts that a delivery service can store and serve.
Progressive Loading
HTJ2K is one feature of the package. When a backend
serves a compatible HTJ2K codestream, react-dicom-viewer includes streaming
and byte-range retrieval configurations that can show useful image data sooner
and refine it as more bytes arrive. The same viewer also works with direct
DICOMweb sources, JPEG-LS, uncompressed frames, local files, and custom loaders.
Following one scan from backend to screen
We can now follow the complete story.
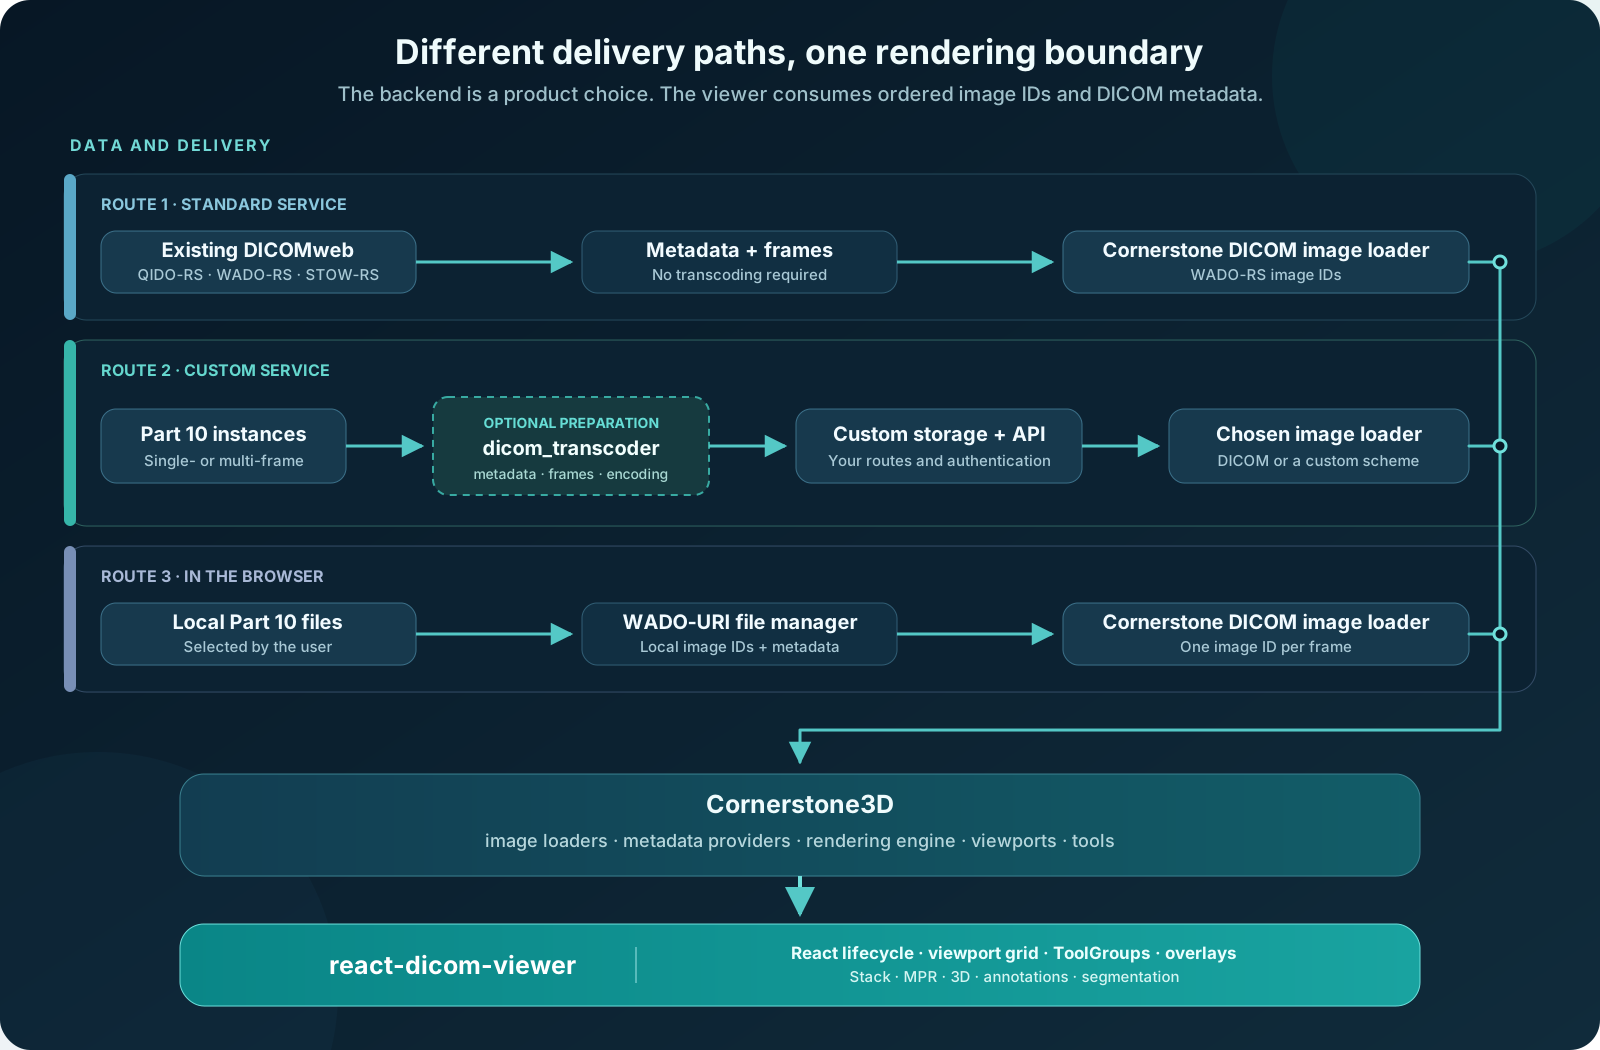
DICOMweb is one route, not a requirement. A custom service or local files can
reach the same rendering boundary, while dicom_transcoder remains an optional
backend utility for the custom-service path.
Route 1: an existing DICOMweb service
The viewer consumes the existing representation. dicom_transcoder is not
needed.
Route 2: a custom service built from Part 10 files
The application controls storage, authentication, search, and URLs. The transcoder is optional on this route. When it is used, it handles DICOM preparation; the React package handles browser imaging.
Route 3: local files
const imageIds = files.map((file) =>
  viewerProvider.metadata.wadouri.addFile(file),
);

await viewerProvider.metadata.wadouri.prefetchMetadataInformation(imageIds);

await viewerProvider.renderSeries({
  imageIds,
  scanIdentifier: "local-series",
  viewportType: viewerProvider.utils.viewportTypes.STACK,
});
No remote backend is involved, yet the final Cornerstone rendering path remains
the same. For a local multi-frame instance, the consuming application prepares
one frame-specific image ID for each frame before calling renderSeries.
What complexity disappears—and what remains
The packages remove a large amount of repeated infrastructure:
| Engineering difficulty | Package support |
|---|---|
| Reading and decoding Part 10 input | dicom_transcoder with pydicom |
| Splitting metadata from frame data | DICOM JSON plus BulkDataURI output |
| Producing selected delivery encodings | Uncompressed, JPEG-LS, and HTJ2K encoders |
| Initializing Cornerstone libraries | Viewer initialization |
| Creating engines, viewports, and ToolGroups | react-dicom-viewer lifecycle setup |
| Rendering single-frame and multi-frame input | The consuming application supplies one ordered image ID per frame |
| Rendering stack, MPR, and 3D | viewerProvider.renderSeries |
| Viewer UI and interaction | Toolbar, overlays, cine, grids, and synchronizers |
| Annotation and segmentation behavior | annotationHandler and segmentationHandler |
Some responsibilities intentionally remain with the product:
- study and series discovery;
- authentication and authorization;
- storage, retention, and URL generation;
- saved annotations and masks;
- autosave, review, approval, and audit workflows;
- de-identification and clinical validation.
That separation is healthy. It keeps the libraries reusable while allowing each application to build the workflow its users actually need.
From an unfamiliar acronym to a useful image
We began with something almost everyone has seen: an X-ray, CT, or MRI image on a screen.
Behind that familiar picture is a rich DICOM object containing pixels, identifiers, geometry, presentation rules, and encoding information. A browser cannot display it like a JPEG because the browser needs to understand all of that context.
Cornerstone3D provides the medical-imaging engine. react-dicom-viewer turns
that engine into a practical React library. dicom_transcoder helps a backend
turn Part 10 input into separately delivered metadata and frames when that path
is useful.
Together, they do not make DICOM less capable. They make its complexity easier to contain—so a development team can move from scan to screen without rebuilding the medical-imaging stack each time.